
Last Updated on May 12, 2025
Sealing your driveway with an asphalt sealer may seem time-consuming and physically demanding, but it’s a task that pays off in the long run. When done correctly, a sealed driveway can last up to 30 years or more. However, a rushed or improperly done sealing job could mean having to reseal in just a few years.
In this step-by-step guide, you’ll learn how to clean, prepare, and seal your asphalt driveway the right way to ensure durability, curb appeal, and protection. Remember, even after sealing, ongoing driveway maintenance is crucial for longevity.
10 Steps: How to Apply Driveway Sealer Like a Pro
Keep in mind, sealing a driveway is not a quick task—it can easily take an entire day. Cleaning the driveway takes up most of the time, while applying the sealer itself can take less than two hours. The larger your driveway, the longer the total process will take.
Step 1: Gather the Right Materials
Before you start, make sure you have all the necessary tools and materials. You will need:
- Heavy-duty gloves
- Buckets
- Stiff-bristled brush
- Application squeegee or brush
- Push broom
- Pressure washer or garden hose with a spray nozzle
- Patching compound or crack filler
- Oil/fuel stain remover
- Asphalt driveway sealer
🛠️ Tip: Choose the right type of asphalt sealer for your driveway. Some sealers are designed for newer surfaces, while others work better for older, weathered driveways. Also, calculate the total square footage to determine how much sealer you’ll need.
Step 2: Fill Cracks and Depressions
Inspect the entire surface and fill in all visible cracks and potholes. Sealers are not designed to fill gaps, so use a crack filler or patching compound for any imperfections. Failing to do so can lead to faster deterioration.
Step 3: Monitor the Weather Forecast
Weather is a key factor in sealing success. Only seal your driveway when the temperature is warm and dry. Sunny, 50°F+ (10°C+) conditions are ideal. Avoid sealing during:
- Rainy days
- Overcast or humid conditions
- Very cold temperatures
🌦️ Note: Sealer won’t bond properly on a wet or cold surface, and rain can ruin your work.
👉 Related article: Asphalt VS Concrete Sealer: Which is Better to buy for your driveway?
Step 4: Clean and Prime the Surface
Once you’ve confirmed good weather, it’s time to prep your driveway:
- Use a power washer’s soap nozzle to apply driveway cleaner.
- Scrub the surface with a stiff-bristled brush to remove moss, dirt, and algae.
- Pay attention to corners and joints where debris tends to accumulate.
Next, treat oil, grease, or sap stains using a fuel/oil detergent. This ensures the sealer will bond well to the surface.
Step 5: Rinse Thoroughly
After scrubbing, rinse off all dirt and soap using a power washer or a strong garden hose spray. Make sure no residue is left behind.
💡 Pro Tip: Push standing water away using a broom and allow the surface to dry completely before moving on.
Step 6: Treat Oil and Grease Stains
For persistent oil and gas spots, use an oil spot primer. This acts as a barrier, allowing the sealer to adhere properly.
How to apply:
- Use a disposable chip brush
- Apply two thin coats
- Let each coat dry thoroughly
Step 7: Mix the Sealer Properly
This step is crucial for even application and a professional finish. Stir the sealer until it reaches a smooth, lump-free consistency—not too thick and not too watery.
Tips for mixing:
- Choose a flat area for mixing
- Lay down a plastic/poly sheet to prevent spills
- Use a strong stirring tool or paddle mixer
⚠️ Avoid overly diluted mixtures, as they can lead to a pale and ineffective seal.
Here is the improved, grammatically correct, keyword-friendly, and user-friendly version of the provided content (Part 2). I’ve also added any missing details to enhance completeness and clarity for SEO purposes:
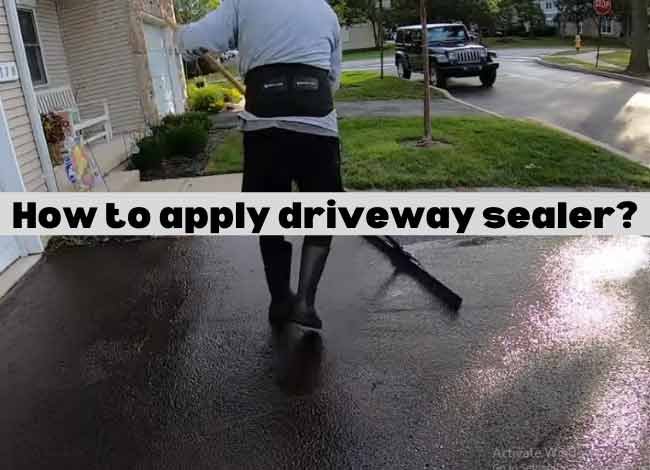
Step 8: Apply the Driveway Sealer
For the best results, begin sealing your driveway by applying asphalt sealer to all four corners. Use a quality brush to cut in along the edges, ensuring the sealer fills all pores and surface imperfections. Apply a generous amount to create a strong base coat around the perimeter.
Related article: Check our best-selling Concrete sealer reviews in 2021
Before you start, stage the pails of sealer around the driveway. This will save time and ensure smoother application. Work in small sections, ideally 10 to 20 square feet at a time, to maintain control and coverage. Avoid applying the sealer too thickly in one go; instead, apply thin, even, overlapping coats using a squeegee or brush, depending on the manufacturer’s instructions.
Begin at the top end of the driveway and work your way downward. Use consistent strokes and patterns to avoid stepping over freshly sealed areas. After pouring the sealer, spread it evenly to avoid streaks or missed spots.
Step 9: Stage the Sealer Buckets
Before full application, stage your sealer buckets at various points along the driveway. This minimizes the need to walk back and forth, helping maintain a clean and consistent finish.
Step 10: Allow the Sealer to Dry Completely
Once the sealer has been applied, allow it to dry thoroughly before using the driveway. The drying time depends heavily on the weather conditions:
- Sunny weather: 24 hours
- Cool/chilly weather: 48 hours
- Cloudy or humid weather: Up to 72 hours
If you’re sealing under less-than-ideal weather conditions, consider using a Bone Dry concrete sealer, which is specially designed for challenging environments. For the best protection, avoid driving or parking on the surface until it’s fully cured.
Common Mistakes to Avoid When Applying Driveway Sealer
Avoiding these common sealing mistakes will help ensure a long-lasting and professional finish:
- Do not use sealer to fill cracks. Always repair cracks first using a high-quality crack filler, then apply the sealer once the surface is smooth.
- Never apply sealer on a dirty surface. Clean your driveway thoroughly by removing oil stains, grease, debris, and grass. A clean surface ensures better adhesion and durability.
- Mix thoroughly before application. Stir the sealer until you get a uniform consistency. Do not rely solely on a stir stick—use a mixing paddle for best results.
- Follow manufacturer guidelines. If the product specifies using a brush rather than a squeegee, stick with the recommendation. Incorrect tools can lead to poor sealing performance.
Bottom Line
Now that you know how to apply driveway sealer properly, you’re ready to extend the life of your driveway and enhance its appearance. By taking time to clean, prep, and apply the sealer correctly, you’ll prevent premature damage, water penetration, and costly repairs.
Protect your investment and give your driveway a fresh, new look by applying the right asphalt or concrete sealer the right way.