
Last Updated on April 21, 2025
Applying a driveway sealer is essential for protecting your concrete from harsh weather conditions, UV rays, water damage, and everyday wear and tear. However, over time, the sealer can start to flake or peel, leaving your driveway looking patchy and unattractive. If you’re planning to apply a fresh finish or a new layer of sealer, it’s crucial to first remove the old asphalt sealer properly. Skipping this step can result in poor adhesion and uneven coating.
Unfortunately, removing asphalt sealer from concrete is not as simple as it sounds. It’s a labor-intensive and time-consuming task that requires patience and the right approach.
How to Remove Asphalt Sealer from Concrete the Easy Way
To successfully remove asphalt sealer from your concrete surface, you’ll need the right tools and safety gear. Here’s a checklist of everything you’ll need before getting started:
- Chemical stripper – Designed to break down the asphalt sealer
- Protective gloves – To shield your hands from harsh chemicals
- Safety goggles – To protect your eyes from splashes
- Nose mask or respirator – Essential for avoiding chemical fumes
- Old work clothes or protective overalls – The process can get messy
- Boots – To protect your feet from spills and debris
- Broom and dustpan – For cleaning up loose particles
- Bucket and clean cloths – For rinsing and wiping down the area
- Paint scraper – Helps to manually lift stubborn sealer spots
- Squeegee – Useful for spreading and removing stripper
- Pressure washer or garden hose – To rinse off the chemical residue
- All-purpose cleaner or detergent – For the final clean-up stage
By using these tools and following the correct process, you can effectively remove old asphalt sealer from your concrete driveway.
Pro Tip: Always test the chemical stripper on a small, hidden area of concrete to ensure it won’t cause discoloration or damage.
Safety should be your top priority during this task. Chemical strippers contain potent ingredients that can cause irritation or injury if used without proper protection. Wear all the recommended safety gear and work in a well-ventilated area to minimize risks.
How to Remove Asphalt Sealer from Concrete: Step-by-Step Guide
Removing asphalt sealer from concrete can be time-consuming, but with the right approach, it becomes manageable. Follow these detailed steps to ensure effective removal and proper surface preparation:
Step 1: Prepare the Area for Sealer Removal
Before you begin, gather all necessary tools and wear protective gear—this includes safety goggles, gloves, a nose mask, boots, and long-sleeved clothing. If you’re dealing with a small area, preparation will be quick. However, for larger surfaces, expect the process to take several hours.
Start by thoroughly sweeping the surface using a stiff-bristle broom to remove dirt, dust, and loose debris. For stubborn spots, use a damp cloth to wipe the area clean.
✅ Related article: How can you easily remove grass from your Asphalt driveway?
Step 2: Apply a Chemical Stripper
Once the area is clean, apply a chemical stripper to loosen the asphalt sealer. Work in sections to maintain control and ensure even application. Pour the stripper directly onto the area where the sealer is present.
Use a squeegee to spread the chemical evenly. Start from the top of the area and work your way down to ensure a consistent coating. Avoid applying stripper outside the target areas to protect the surrounding concrete.
Step 3: Let the Stripper Sit
Allow the chemical stripper to sit for at least 15 to 20 minutes. This soaking time is essential for breaking down the bond between the asphalt sealer and the concrete. Avoid overapplying, as excess liquid can run off and cause uneven removal.
Make sure the application is even. Applying too little may not loosen the sealer effectively, and applying too much could damage untreated areas.
Step 4: Scrape Off the Sealer
After the stripper has settled, use a paint scraper or floor scraper to remove the softened asphalt sealer. As you scrape, you should start to see the raw, textured surface of the concrete.
Be careful of splashback and ensure proper disposal of the scrapings. If certain spots are stubborn, reapply the chemical stripper, wait another 15–20 minutes, and try scraping again. If the sealer still doesn’t come off, consult a professional contractor for assistance.
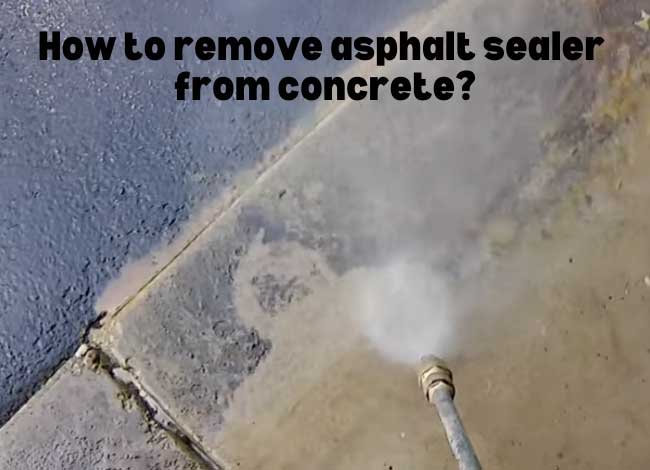
Step 5: Rinse the Area Thoroughly
Once the sealer has been removed, rinse the concrete thoroughly using a pressure washer or a garden hose with a strong nozzle. For best results, use a pressure washer with at least 2700 PSI.
This step helps to wash away leftover residue and prepares the surface for deeper cleaning.
Step 6: Deep Clean the Surface
Mix a solution of 50% warm water and 50% mild detergent or soap. Pour this over the cleaned area and scrub thoroughly with a stiff brush or deck brush. Scrub for 10 to 15 minutes to remove any lingering traces of asphalt sealer or chemical stripper.
After scrubbing, rinse the area again with clean water using a pressure washer or hose. Repeat this process if necessary to ensure a residue-free surface.
Step 7: Allow the Surface to Dry Completely
Let the concrete dry completely before applying any new sealer or surface finish. Drying time will vary depending on weather conditions, but sunny days will help speed up the process. Avoid resealing too soon, as leftover moisture can compromise adhesion and sealing performance.
Why Is Asphalt Sealer Not the Best for Concrete?
Many people assume that asphalt sealer is ideal for all surfaces, but asphalt sealer is not recommended for concrete. While it may create a temporary seal, it is specifically formulated for asphalt surfaces—not concrete. Applying asphalt sealer on concrete can lead to poor adhesion, discoloration, and even damage over time. Concrete requires a concrete-specific sealer (such as acrylic, silicate, or epoxy-based) to ensure long-lasting protection against moisture, chemicals, and UV damage.
How Long Does It Take to Remove Asphalt Sealer from Concrete?
Removing asphalt sealer from concrete is a labor-intensive process that requires time and effort. It’s important to understand that this won’t be a quick, two-minute task. If your concrete driveway or patio is large, it could take several hours to an entire day, depending on the surface area and thickness of the sealer layer.
In some cases, you may also need to repair small damaged sections after removal, adding extra time to the project. Additionally, it’s wise to measure the area before starting, especially if you plan to reapply a more suitable concrete sealer afterward.
Summary: Can You Remove Asphalt Sealer from Concrete?
Yes, you can remove asphalt sealer from concrete, but it’s not an easy process. Due to concrete’s hardened and porous nature, removal requires the right tools and methods, such as chemical strippers, pressure washing, or mechanical grinding.
Here are a few tips:
- Use a commercial-grade sealer stripper designed for asphalt removal.
- Scrub using a stiff-bristle brush or pressure washer.
- For tough spots, consider a floor buffer or grinder with an appropriate pad.
If the asphalt sealer doesn’t come off completely after the first attempt, repeat the process. If multiple attempts fail, it’s best to consult a professional contractor who has the right equipment and expertise.
With patience and proper technique, you can successfully remove asphalt sealer from your concrete and restore its original appearance. For long-term protection, make sure to reseal using a high-quality concrete sealer.