
Last Updated on June 19, 2025
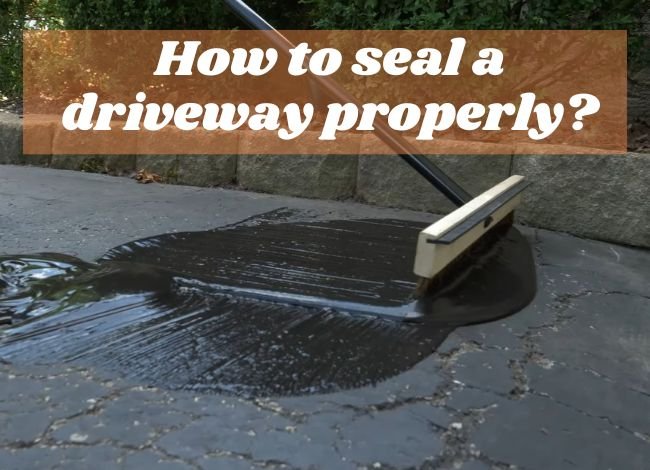
Driveway sealing is one of the most crucial maintenance steps to ensure the longevity, durability, and aesthetic appeal of your driveway. Whether your driveway is made of asphalt or concrete, sealing acts as a protective shield against various damaging elements, such as harsh weather conditions, frequent vehicle traffic, chemical spills, and moisture infiltration. Without proper sealing, the driveway surface can deteriorate due to exposure to sunlight, rain, snow, and oil spills, leading to cracks, fading, and structural weaknesses over time. By applying a high-quality sealant, you can extend the lifespan of your driveway, improve its resilience, and enhance your property’s overall curb appeal. If you’re wondering How to Seal a Driveway the right way, this step-by-step guide will help you achieve a smooth, durable finish that protects your driveway for years to come.
Key Benefits of Driveway Sealing
-
Prevents Water Damage
Water penetration is one of the primary causes of driveway deterioration. When moisture seeps into small cracks and crevices in the pavement, it can lead to significant issues, especially in colder climates. During winter, trapped water can freeze and expand, causing the cracks to widen and eventually form potholes. Sealing the driveway creates a waterproof barrier that prevents water from infiltrating the surface, reducing the risk of damage and costly repairs.
-
Minimizes Cracking and Potholes
Over time, driveways are exposed to heavy loads from vehicles, temperature fluctuations, and environmental wear and tear. These factors contribute to the formation of cracks and potholes, which can worsen if left unaddressed. Regular sealing helps reinforce the pavement, preventing small cracks from expanding and transforming into more severe structural issues. By maintaining a sealed surface, homeowners can prolong the life of their driveways and avoid expensive repair work.
-
Shields Against Oil and Chemical Spills
Vehicles often leak fluids such as oil, gasoline, and other chemicals, which can stain and weaken the integrity of a driveway. Unsealed surfaces are more porous, allowing these substances to penetrate deep into the material, causing permanent stains and structural degradation. Sealcoating creates a protective layer that repels chemicals, making it easier to clean spills and maintain the driveway’s pristine condition.
-
Enhances Aesthetic Appeal
A well-maintained driveway contributes significantly to the overall appearance of a property. Over time, asphalt driveways tend to lose their dark, rich color due to oxidation and exposure to UV rays, making them look dull and worn out. Similarly, concrete driveways can develop discoloration and surface imperfections. Sealing restores the original color and provides a smooth, polished look, enhancing the curb appeal of the property. A freshly sealed driveway gives a neat, well-kept impression to visitors and potential buyers if the property is on the market.
-
Protects Against UV Rays and Oxidation
Prolonged exposure to direct sunlight can have a deteriorating effect on asphalt driveways. UV rays break down the binders in asphalt, making the surface brittle and more susceptible to cracking. Oxidation further weakens the material, reducing its flexibility and structural integrity. Sealcoating acts as a sunscreen for the pavement, preventing UV-induced damage and slowing down the oxidation process. This protection extends the driveway’s lifespan and maintains its structural strength for years to come.
-
Reduces Long-Term Maintenance Costs
Preventive maintenance is always more cost-effective than major repairs or complete driveway replacements. Driveway sealing is a proactive approach to extending the life of the pavement while minimizing repair expenses. A properly sealed driveway is less prone to damage, meaning homeowners can avoid costly fixes associated with deep cracks, potholes, and surface erosion. Investing in regular sealcoating can save thousands of dollars in long-term maintenance.
-
Improves Surface Smoothness and Cleanliness
A sealed driveway has a smoother, more uniform surface, making it easier to clean and maintain. Dirt, debris, and stains are less likely to penetrate a sealed surface, allowing for quick and effortless cleaning. Whether sweeping, pressure washing, or using a leaf blower, maintenance is far more manageable when the driveway has a protective sealant.
-
Prevents Weed Growth and Vegetation Intrusion
Unsealed driveways are more vulnerable to weed growth, as small cracks and gaps in the pavement provide an ideal environment for weeds and grass to sprout. These invasive plants can further widen cracks, leading to more significant structural problems. Applying a sealant prevents vegetation from taking root, reducing the need for constant weed removal and keeping the driveway looking well-maintained.
Common Driveway Sealing Mistakes to Avoid
Sealing your driveway is an important maintenance task that protects it from weather damage, stains, and daily wear. However, many homeowners unknowingly make mistakes during this process, which can compromise the effectiveness and lifespan of their driveway sealant. Here are some detailed explanations of common errors and how you can avoid them: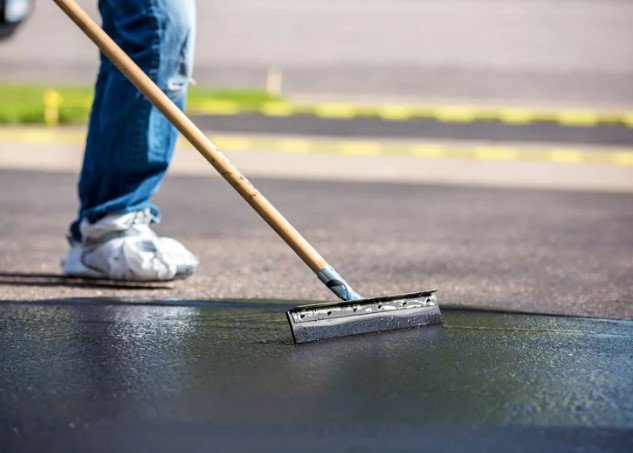
-
Applying Sealant Too Early
Newly paved driveways need adequate time to cure before sealing. Typically, asphalt driveways require a curing period of 6 to 12 months, whereas concrete driveways might take slightly longer. Applying sealant prematurely traps moisture and oil residues within the material, preventing it from properly curing. This leads to weak adhesion, surface deterioration, and a shorter lifespan for your driveway. To avoid this, ensure your driveway has completely cured and consult your paving contractor if unsure about timing.
-
Sealing Too Often
While sealing is beneficial, doing it excessively can cause more harm than good. Over-sealing creates thick layers that eventually crack, peel, and deteriorate due to buildup. The ideal timeframe for resealing your driveway is typically every 2-3 years, depending on the climate and traffic. Pay attention to visible signs of wear instead of automatically resealing annually. Properly timed sealing will effectively protect your driveway without damaging it.
-
Sealing Over Existing Damage
Simply applying sealant over existing cracks, potholes, or damage provides only a superficial solution. Underlying issues remain unresolved and tend to worsen over time, causing the sealant to crack and degrade faster. Before sealing, thoroughly inspect your driveway and repair any damage—filling cracks and holes, addressing structural issues, and ensuring the surface is clean and level. This preparation ensures that your sealant adheres properly, providing long-term protection.
-
Ignoring Weather Conditions
Weather significantly impacts the effectiveness of driveway sealing. Ideal conditions include temperatures ranging between 50-90°F (10-32°C), with clear, dry weather forecasted for at least 48 hours. High humidity, rain, extreme heat, or freezing temperatures can prevent the sealant from curing correctly, resulting in uneven sealing, cracking, or peeling. Always check the weather forecast in advance and choose optimal conditions for your sealing project.
Read More: What is the Best Time to Seal Driveway?
-
Hiring an Inexperienced Contractor
Not all contractors have the necessary expertise to effectively seal driveways. Hiring inexperienced or unqualified personnel can lead to poor preparation, incorrect sealant application, and ultimately wasted time and money. To ensure you receive quality service, thoroughly vet potential contractors. Ask for references, check online reviews, and request to see examples of previous work. Experienced professionals can offer guidance and complete the sealing job efficiently, saving you money and stress in the long run.
How to Prep for DIY Driveway Sealing
If you’re planning to seal your driveway yourself, thorough preparation is essential to ensure professional-quality results. Follow these detailed steps to achieve a smooth, durable finish: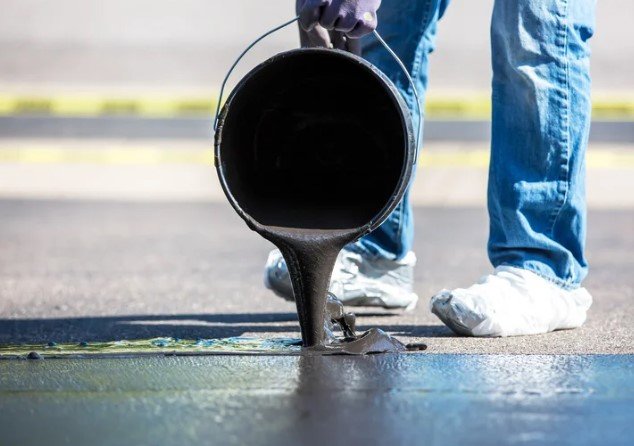
-
Purchase the Right Driveway Sealant
The type of driveway sealant you select significantly affects its durability, appearance, and longevity. Here are three common options:
- Coal Tar Sealers – Extremely durable, offering strong resistance to oil, gasoline, and various chemicals. Ideal for heavily used driveways but may raise environmental concerns.
- Asphalt-Based Sealers – More environmentally friendly, producing fewer odors and harmful vapors. These sealers provide good general protection but are less resistant to fuel and oil spills.
- Acrylic Sealers – Provide excellent UV protection and color enhancement, making them perfect for concrete driveways. They typically have a longer lifespan and resist discoloration, but they can be pricier.
-
Collect Your Tools and Supplies
Gathering the right tools beforehand helps streamline your sealing project and ensure efficiency. Ensure you have:
- Driveway sealant (chosen based on your driveway’s material and usage needs)
- Crack filler (essential for repairing small cracks and holes before sealing)
- Pressure washer (for thorough cleaning of dirt, stains, and loose debris)
- Broom or stiff-bristled brush (for removing surface dirt and ensuring a clean surface)
- Squeegee or roller (for evenly spreading the sealant across the driveway)
- Protective gloves and goggles (to safely handle chemicals and protect your eyes and skin)
- Painter’s tape (to protect surrounding areas, edges, and borders from accidental sealant application)
-
Check the Weather Forecast
Weather conditions significantly impact the quality and effectiveness of your driveway sealing. Aim to perform your sealing project under ideal conditions:
- Dry weather with no rain forecasted for at least 48 hours.
- Temperature between 50°F and 90°F (10°C – 32°C).
- Low humidity, as high humidity can prevent proper curing and cause uneven application.
Step-By-Step Guide How to Seal a Driveway Yourself!
Sealing your driveway effectively requires careful attention to preparation and application. Follow this comprehensive, step-by-step guide to achieve a professional finish:
-
Trim Overgrown Shrubs and Weeds
Begin by removing vegetation around the driveway’s edges. Overgrown plants, weeds, and grass can interfere with the sealing process and lead to uneven edges. Trim vegetation neatly to keep the sealing area clean and clear.
-
Clean Your Driveway
Thoroughly clean your driveway using a pressure washer to eliminate dirt, dust, debris, and loose particles. Pay special attention to removing embedded dirt, as leftover debris can negatively affect the adhesion and appearance of your sealant.
-
Scrub Out Oil Stains
Oil and grease stains can severely compromise sealant adhesion. Use an effective degreaser to scrub and remove these stains. After applying the degreaser, scrub vigorously with a stiff brush, then rinse thoroughly and let dry completely before proceeding.
-
Prime the Area
If your driveway has significant staining or discoloration, apply a driveway primer to ensure optimal adhesion. Priming creates a uniform surface that helps sealant adhere better, especially in heavily stained areas.
-
Repair Cracks and Potholes
Before sealing, repair any existing damage to your driveway:
- Small cracks: Use crack filler to fill and smooth minor cracks, preventing further damage.
- Larger potholes: Apply a patching compound, packing it firmly to create a smooth, even surface. Allow repairs to fully cure based on manufacturer guidelines before sealing.
-
Tape Off Edges
Use painter’s tape to protect surrounding surfaces, edges, sidewalks, and curbs. This step ensures crisp, clean lines and prevents sealant from accidentally staining adjacent areas.
-
Mix the Sealant
Mix your sealant thoroughly, following the manufacturer’s instructions. Stirring ensures the sealant’s consistency is even, improving application quality and preventing lumps or uneven coverage.
-
Apply Sealant Around the Edges
Using a small brush, carefully apply sealant along driveway borders, edges, and tight spaces. This ensures accuracy and helps avoid accidental spills or smears on adjacent surfaces.
-
Apply a Thin Coat of Sealant
Spread a thin, uniform coat of sealant across your driveway using a squeegee or roller. Work systematically, starting from one end and moving toward the other, ensuring an even coverage without excess thickness.
-
Apply a Second Thin Coat (Optional)
For enhanced durability and longevity, consider applying a second thin coat of sealant after the first has fully dried. This additional layer strengthens protection against weather, traffic, and general wear, significantly prolonging the life and appearance of your driveway.
Professional vs DIY Driveway Sealing
Choosing between hiring a professional and doing driveway sealing yourself involves careful consideration of several factors, including cost, time, expertise, and desired outcomes. Here’s an expanded look at the advantages and disadvantages of each approach:
Pros and Cons of Hiring a Professional
Pros:
- Ensures even coverage and high-quality results: Professionals have specialized equipment, extensive training, and significant experience that enable them to achieve uniform application and professional-quality results. They can accurately evaluate driveway conditions and apply suitable treatments efficiently.
- Saves time and effort: Sealing a driveway involves meticulous preparation, proper application techniques, and post-application care. Hiring professionals can save considerable time and effort, especially for homeowners with busy schedules.
- Access to commercial-grade sealants: Professionals use premium commercial-grade products often unavailable to the general public. These sealants typically offer superior protection, enhanced durability, and a longer lifespan compared to standard consumer-grade materials.
- Professional guidance and consultation: Hiring a professional offers the benefit of expert advice regarding the type of sealant best suited to your driveway’s condition, climate, and specific maintenance needs.
Cons:
- Higher cost compared to DIY: Professional sealing involves labor costs, overhead, and commercial-grade materials, making it generally more expensive than doing it yourself.
- Dependent on contractor availability: Scheduling constraints and contractor availability can result in waiting times, potentially delaying your maintenance schedule.
- Risk of hiring inexperienced contractors: If not properly vetted, some contractors may lack the necessary skills, leading to substandard results.
Tips for Successful DIY Sealing
If you choose a DIY approach, following these detailed tips can help ensure success: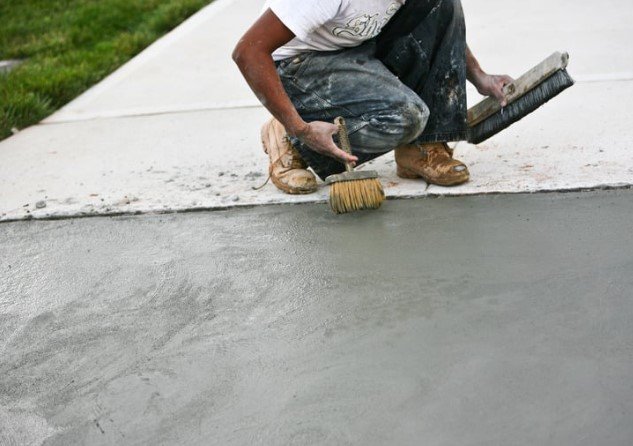
- Preparation is crucial: Thoroughly clean and repair your driveway before sealing. Remove dirt, debris, oil stains, and vegetation for optimal results.
- Follow manufacturer instructions precisely: Adhere strictly to product guidelines regarding drying times, application methods, and safety precautions to achieve maximum durability.
- Apply thin, even coats: Multiple thin coats of sealant adhere better and dry more evenly compared to thick applications, which can crack or peel prematurely.
- Weather considerations: Conduct sealing in mild, dry weather conditions. Avoid extreme temperatures, humidity, or precipitation, as these factors hinder proper curing.
- Use proper tools: Invest in high-quality application tools such as squeegees, rollers, and brushes, which ensure even and effective application.
Maintaining Your Sealed Driveway
Recommended Maintenance Schedule:
- Regular resealing: Plan to reseal your driveway every 2-3 years or as needed based on its condition and usage.
- Routine cleaning: Regularly sweep and wash the driveway surface to prevent dirt, leaves, and debris from accumulating and damaging the sealant.
- Gentle winter maintenance: Avoid harsh de-icing chemicals and use alternatives such as sand or calcium magnesium acetate, which are less damaging.
Extending the Life of Your Sealant:
- Promptly address any small cracks or damage using suitable repair compounds to prevent them from expanding.
- Quickly clean spills from oil, chemicals, or fuel to minimize surface degradation and staining.
- Regularly maintain cleanliness using a broom, leaf blower, or gentle washing to preserve the driveway’s condition and appearance.
Additional Information on Driveway Sealing
Environmental Impact of Sealants
Many traditional sealants contain volatile organic compounds (VOCs) that pose environmental and health risks by contributing to air pollution and respiratory issues. Opting for low-VOC or water-based sealants reduces environmental harm while effectively protecting your driveway.
Alternative Driveway Protection Methods
Exploring other driveway protection methods can provide additional benefits:
- Concrete Resurfacing: Adds a new protective and decorative layer, refreshing the look and structural integrity of your existing concrete driveway.
- Paving Stones: Offer superior durability, easy maintenance, and aesthetic appeal, significantly reducing sealing requirements.
- Gravel Driveways: An affordable and low-maintenance alternative requiring minimal upkeep and no sealing, though periodic leveling may be necessary.
How Often Should You Seal a Driveway Based on Climate?
Driveway sealing intervals vary significantly based on regional climate conditions:
- Cold climates: Harsh freeze-thaw cycles require driveway sealing approximately every 2 years to prevent cracking and surface deterioration.
- Moderate climates: Generally reseal every 3 years, balancing protection with maintenance efficiency.
- Hot climates: Sealing every 2-3 years is essential to protect against continuous sun exposure and prevent surface damage and fading.
By carefully considering these detailed guidelines and best practices, you can effectively maintain a durable, aesthetically pleasing driveway. Whether choosing professional services or tackling the project yourself, consistent and careful maintenance ensures long-term durability, enhances curb appeal, and ultimately adds value to your property.
Final Thoughts of How to Seal a Driveway:
Sealing your driveway properly is one of the best ways to extend its life, maintain its appearance, and protect it from harsh weather, oil spills, and everyday wear. With the right preparation — including cleaning, crack filling, and choosing a quality sealer — you can achieve a smooth, durable finish that enhances your home’s curb appeal. Whether you’re sealing an asphalt or concrete driveway, following the correct process and allowing proper curing time is key to long-lasting results. By making driveway sealing a part of your regular home maintenance routine, you’ll save money on costly repairs and enjoy a clean, well-protected surface for years to come.